
Post Processing for Podcasts

Liam Freivald
So, you have recorded your podcast session in multitrack, you’ve done your editing, but something still sounds like it might be missing. What is it, and how do you take your podcast’s sound that last twenty percent?
The secret is that most podcasts aren’t just recorded raw; there is often a fair bit of post-processing that happens to the audio to help polish things up that last bit to make the host and guests sound their best. This is usually some de-essing, some EQ, and some compression.
Each of these steps helps bring an extra bit of polish to the recording, making it easier on the ears and much cleaner and clearer for the listener.
EQ
Let’s start with EQ. Podcasting in particular deals primarily with the voice instead of instruments, and while each person’s voice is unique and will therefore require some experimentation to find what the best EQ curve is in the end, there are a few consistent best practices to keep in mind for the best outcomes.
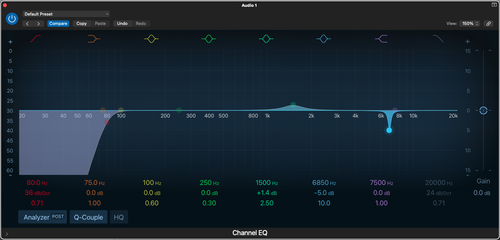
The first is to cut sub-bass below 80 Hz if your microphone does not have a low-cut option built in. This is often caused by larger machinery, such as a boiler or even a washing machine, running in the same building without the mic being fully isolated from surrounding structures (even using a broadcast arm can still pass in some of this low rumble to the mic if there isn’t a full shock mount used). This “rumble” can take up extra headroom, and make the signal muddy for headphone listeners if enough of it builds up between multiple mics.
Next is managing yours mids. While the fundamental of most human voices sits below 250 Hz the majority of the information our brains use to comprehend the physical sounds of speech live between 300 to 3,400 Hz. This is why certain broadcast microphones (such as Samson’s Q9U) have some sort of midrange boost or “presence” switch. However, finding and carefully tuning that midrange with some precision EQ tools will help you improve clarity more than an across-the-board boost will allow for. If there’s one space to spend extra time EQing, it’s this mid-range band in particular.

De-essing
The last section starts to cross into de-essing, mostly because it has to do with the same frequency range, but the sounds between 6-10 kHz is also important to manage. A boost here can help a darker recording gain more clarity, but a particularly bright recording here might need some taming of these higher frequencies to make sure that the podcasters’ voices don’t sound too harsh. This is one to listen to and experiment with, and if possible to use very high-Q bands to manage, as this is where resonant frequencies like whistles and clicks come through the most.
To pivot slightly, this same 6-10 kHz band is where de-essing becomes important. S-sounds in particular can be very harsh to some people depending on the volume and the speaker, and this especially depends on the concept of sibilance. Sibilance refers specifically to how close the tongue tip is to the teeth when making S-sounds, and that gap can determine the pitch and volume of that S-sound. Because it is a set pitch, it is essentially a resonating frequency in at a fairly high sonic frequency, which can be very unpleasant for some listeners depending on how they’re listening to it. Each speaker will have a unique sibilance, but tools like a dedicated de-esser (which most DAWs and recording software come bundled with these days) can help find and manage that sound to make it significantly less harsh. If you do not have access to a de-esser plugin, you could always use a high-Q equalizer to reduce the specific frequency by the right amount, or use a compressor’s filter function to apply volume reduction to the specific band as well. Be careful not to reduce it too much, however, or the recording will sound unnatural.

Compression
Lastly is compression. This one is something to be careful of, as the goal is to smooth out the dynamics rather than quash them entirely. A smoothed out volume level is the end goal here, so that the listener doesn’t have to strain to hear the quiet parts and have their ears blown out by the loud parts, but that the natural feel of the speaker isn’t lost and made flat and lifeless.This usually means a relatively high threshold (above 15 dB), low compression ratio (usually below 3:1), a slower attack (above 20 milliseconds), and a fast release (under 12 milliseconds). All of these can be adjusted for the particular speaker, of course, particularly the threshold and ratio, but these are good settings to start in order to level out the volume somewhat.
With all of these processes combined, you can take a raw podcast recording that extra 15% and give it a true professional sound. This makes it easier on your listeners, which is crucial to keeping them hooked and engaged. Your audience is, after all, your best tool to expanding your show’s reach.
About the Author