
The Skinny on Compressors and Limiters
Samson
Sound that is intended to be captured for recordings can have a vast range of audio levels, up to 120 dB, whereas the dynamic range of the recording medium and gear capturing the audio maybe far less. Pair that with ambient noise in listening environments, we look to processing in order to even out the dynamic range of recordings to enable comfortable listening in most environments. To begin to understand dynamics processing, we must first understand what dynamics are. Dynamics, or the dynamic range of a signal or audio device, is the useful operating range between the softest and loudest output — in between the noise floor and distortion. Dynamics processing applied to a signal manages changes in level. The human ear is an amazing organ, with the ability to perceive from the faintest whisper to a monstrous jet engine. Unfortunately, there are limitations with the capability of audio equipment to realistically reproduce this huge dynamic range.
Noise floor is the minimum constant noise level of equipment – typically sounding like hiss. As the program material (audio in a system that could be either a full mix or a single track) gets softer it approaches the noise floor and can get low enough to be engulfed by it. This can become a problem during quiet sections of music. When program material is louder, it masks the noise, so it is not a problem. At the other end of the dynamic range spectrum is distortion. Digital audio goes from clean to distorted abruptly, so we try to create a safety margin of space between the average level and the maximum signal before clipping, called headroom. Lowering the overall operating level (turning down the volume control) leaves room but moves the average program material closer to the noise floor. Our goal is to keep the standard operating level as high as possible without risking distortion.
Various types of processing effects (hardware and software) are available to control dynamics including Compressors, Limiters, De-Essers, Noise Gates and Expanders. All of these processes have a unique effect on the signal, but one common element they share is that in one way or another they control gain (affect the signal’s dynamic range). Some dynamics effects control gain in a subtle way by slightly reducing how soft and loud a signal is, while others make drastic changes in gain like reducing the signal until it’s off. Applications for dynamics processing can be categorized by two distinct groups: first, to treat a signal that has an unpredictable dynamic range and make it predictable, and second, to create a “sound” by squeezing out the dynamic range. They can be used to avoid overdriving or distorting the signal by restricting the dynamic range to protect speakers when running live sound or program material for broadcast and distribution. The following is a basic overview of dynamics processing and how it is used to improve the quality of recorded and live sound.
Compressor
A compressor is one of the most useful tools in live sound and recording. Compressors are used to control the dynamic range of a signal, which offers a variety of benefits including leveling out a signal that’s being recorded, having an instrument sit better in the mix, and increasing the loudness of a sound system to name a few. In essence, it is an automatic volume control. The compressor responds when the audio goes past a predetermined level (threshold) and then turns down the volume at a rate based on the setting of the compression ratio. When the incoming signal returns to the threshold level, the compressor responds by restoring the gain to normal. Drastic amounts of compression will also result in an effect that becomes more of a pumping sound, than just controlling gain.
Limiter
A Limiter is a specific form of a compressor configured to prevent peaks and for general overload protection. Compression and limiting are closely related effects. The difference is the degree to which the dynamic range is limited. The relationship of the input level versus the output level change is called the compression ratio. Although there are no strict standards, ratios up to 2–10:1 are typically considered compressors, while higher ratios are called limiters. There are constant changes in loudness in any program material. When a peak occurs, the limiter responds. For signal that’s above the threshold the limiter prevents the signal from becoming any louder by providing as much attenuation is needed to keep the signal from exceeding the threshold, any signal below the threshold is left unaffected. By limiting the signal, and adding output gain you raise the entire level to get the overall program material louder. The amplified limited signal has a much higher average level than the original signal which makes the signal jump out at you and have more punch.
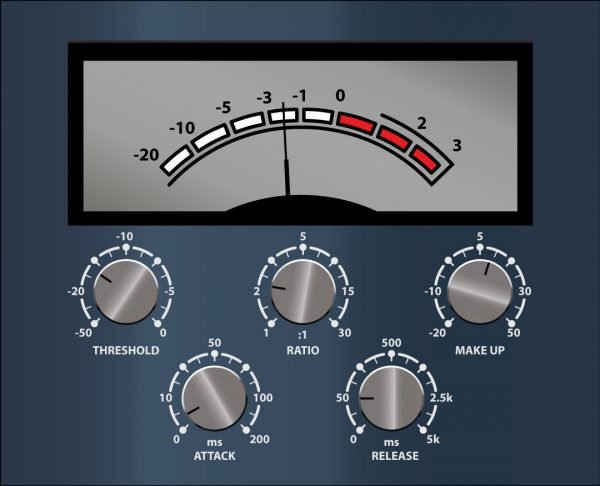
To understand how a dynamic effects work, it is necessary to become familiar with the basic parameters of working with them which include threshold, ratio, attack time, and release time.
Threshold
Threshold can be thought of as a switching point. It is the level that once the signal exceeds, gain reduction is applied. Changing the relationship of the input level to the threshold will determine the amount of gain reduction or how much of the signal is affected. If the threshold level is set above the highest level (peak) of the signal being sent to the compressors, the gain reduction is never triggered. Therefore, the compressor is virtually bypassed. If the threshold level is set very low so that any signal will trigger gain reduction, the compressor is working as an automatic leveler.
Once the input signal increases above the threshold, the output signal will be reduced by an amount dependent on the ratio setting and the amount that the signal is above the threshold. For compression the threshold is typically set quite low, so that even low-level signals will activate the compressor. For limiting the threshold is usually set quite high, so that the dynamics of the signal are preserved, but extremely high levels are reduced to protect amplifiers, speakers or distortion in recordings.
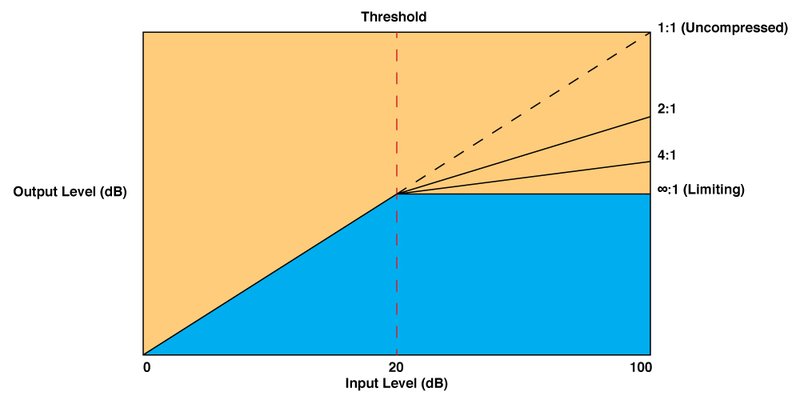
Ratio
The ratio control is used to set the proportion of gain reduction in relationship to the input signal. Ratio (1:1 to ∞:1) determines how the output signal will change in relation to the input signal once it passes the threshold. The first number indicates how many dB of input will cause 1dB of output change. The higher the ratio, the greater the compression, the more the sound will be squeezed. For example, if the ratio is set to 2:1, an increase in level of 2 dB will produce a 1 dB increase in level at the output. An increase of 4 dB will produce 2 dB increase at the output. A more drastic gain reduction results from ratios of 12:1 to 20:1. The output level is limited and for practical purposes cannot exceed a preset level. Dynamic range is significantly reduced and high-level peaks are minimized. A ratio setting of ∞ to 1 means that an infinite amount of input signal is needed to raise the output level by 1 dB. This means that the output level stays virtually constant regardless of how the input level changes.
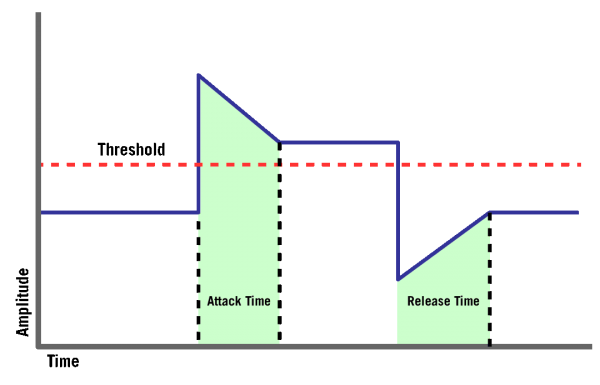
Attack Time
Attack time is the amount of time that a compressor takes to affect the gain reduction after the signal rises above the threshold level. Attack times can range from about from 20 μs (microseconds) to 150 ms (milliseconds). The longer attack time, the more signal dynamics get through before compression kicks in. Fast transients and high frequencies with large peak-to-peak amplitudes require a fast attack time so that the limiter can respond in time to control the peak level. But too fast of an attack time may square off the top of waveform, producing a distorted sound. However, limiting with a fast attack time can alter the musical quality of some instruments that are characterized by percussive attack. With slower attack times the compressor allows the first segment (initial attack) of the signal to pass through unaffected and responds to average level of the signal, producing a smoother sound and retaining the dynamic character (e.g. lets pick of guitar or beater of kick drum pass through before compressing the signal).
When applying dynamic processing to live sound, the fastest attack time possible will provide the maximum protection against overload, but will cause some alteration to the sound. On prerecorded music, slower attack times may be used to maintain a higher overall average volume level.
Release Time
The release time is set to control how long the compressor takes to return the input signal back to its original level once the signal falls below the threshold level. The range for release times is from around 50μs all the way up to 5 seconds. In normal use, faster release times are used for spoken word and longer release times are generally better for instrumental music. If the release time is extremely short, it will track every change that drops below the threshold and can make the sound uneven. This can be called pumping or breathing which occurs when overall gain modulated up and down by repeated peaks which are followed by quieter intervals. If the release is too fast, the overall volume level will jump up and down. Extremely short release times may even introduce harmonic distortion if the gain reduction changes between cycles. Longer times tend to squash the signal by producing less overall output, but it will retain the signal’s dynamics. Setting the release time long will maintain the initial gain reception caused by a large amplitude and the dynamic range of the passage which follows is strongly affected. If the gain reduction continues through a soft program section, it may make the section inaudible because it will be reduced in gain also. Short dynamic changes will be ignored due to the continuous high level of gain reduction.
For program material with little low-frequency content, a fast release time can be used. The highest apparent average level may be attained with the shortest release time before pumping becomes noticeable. For program material containing a lot of low frequency content, the release time must be increased to the point that no low frequency distortion is apparent. A further compromise may be made by slightly reducing the amount of limiting in favor of slightly faster release times for a higher average level.
Soft-Knee / Hard-Knee
Knee is the designation that refers to how quickly the compressor clamps down on the signal once it passes the threshold. With a Hard knee, the compression clamping happens immediately. The processor goes from off to full compression at the threshold point. Sound will not increase despite changes in input level, this is often used to eliminate loudspeaker or amplifier clipping. With a Soft knee, the compression becomes progressively greater past a certain point until it flattens out and clamps the signal fully. This provides a smoother sound, and can help even out an instrument’s dynamic range. It is quite common to have a variable control to independently adjust the response of the knee.
Noise Gate
All recording gear generates some level of constant noise. During periods of silence, if there is nothing to mask the noise it can become obtrusive. This is particularly true in multi-channel recordings or at live events where each track is contributing to the overall noise level. You can ride all the volume faders to silent passages, but even with software where you can draw volume changes, that is a lot of work.
Noise gates are used to remove unwanted noise and/or bleed from recorded tracks in the studio or from open microphones in live sound systems. Noise gates can also be used as a sound effect, most commonly to chop the end of a reverb, let’s say on a snare drum so that the entire snare sound ends just before the beat.
The basic principle of a noise gate is to function as an automatic mute switch. Mute Off (Gate Open) when the desired signal is present and Mute On (Gate Closed) when the desired signal is not present. In order to get the gate to work predictably, it is necessary to set a threshold that will determine when the gate will open. If the signal is below that threshold the gate will remain closed and sound will be muted. When the signal is above the threshold, the gate will trigger open allowing the desired signal to pass and be heard.
Gates work only during periods of silence, they will not remove noise that is audible when there is program material present. When recording drums, a gate can reduce leakage between the microphones (bleed between mics can causes phase cancellations, excessive ringing and spurious noise). Gating (especially on snare, mic and toms) can produce a very tight clean controlled drum mix. Very fast attack times and relatively short release times are most appropriate.
Frequency selective gating can be used to remove a specific frequency band of noise, e.g. air conditioner rumble. To accomplish this, follow the steps in the sidechain section below for frequency dependent side chaining, but raise the low-frequencies you want to gate.
Downward Expander
The purpose of a Downward Expander is to increase the perceived dynamic range of a system. This is accomplished by decreasing the gain during the softer sections, thereby lowering the relative noise floor. When the signal level is below the desired threshold level, the expander lowers the overall gain by the selected amount.
For example, if the ratio is 1:2, -1 dB of input level change will cause 2 dB of output change. This action tends to keep loud sounds loud and make soft sounds softer. A mild 1:2 expansion ratio is useful for increasing the dynamic range of a signal source and increasing the apparent volume differences between the desired signal and the background noise. For situations where a more defined relationship of signal and noise is desired the ratio may increase to 1:10 or beyond. These higher ratios start to act like noise gates. The slightest detected signal gates the expander on, while higher noise levels do not.
Sidechain / External Key
Sidechain compression is a function that uses an external process to activate compressor’s detector circuit. There are many useful applications for signal processing via the detector circuit including keying off a track for Ducking (e.g. lowering a track when the kickdrum hits or reducing the level of background music when a host is speaking) or Frequency Dependent compression for De-Essing – remove sibilance caused by /s/ sounds in the upper midrange and treble.
Using a compressor as a De-esser
If your vocals have excessive sibilance, you will want to limit the signal only when high frequency /s/ sounds occur. De-essing is different from equalization. Cutting high frequencies with an EQ would result in a loss of important high frequency information of the entire recorded track, whereas de-essing has no effect whatsoever on the signal except at the instance of the sibilant. Connect the sidechain/external key output to the input of an equalizer and the output of the equalizer to the sidechain/external key input. Boosting the EQ on a particular frequency band will trigger the compressor thus limiting the signal for that frequency. De-essing frequencies range from 2kHz to 10kHz. Start by trying excessive boosts around those frequencies. If frequency is correct the excessive gain will trigger the compressor when an overly sibilant passage occurs. The high frequency of /s/ sounds will trigger program limiting more readily than non /s/ sounds. Keep trying adjacent frequencies to see which gives the best result. Set the attack and release to be as fast as possible so sibilant peaks are eliminated without audible changes in program material.
Using a dynamic effects processor
When placing the compressor in your signal chain, in most cases it is better to place the compression after EQ. This is because the EQ can eliminate the amplitude balance achieved by the compressor. An exception would be in the case of large dynamic changes in program material that are too difficult for the EQ to handle and would result in an overloaded signal or poor signal-to-noise ratio. When using dynamic processors, be careful as the ear is not particularly sensitive to level changes. It is possible to add a lot of limiting before it becomes apparent. Gain reduction meters are important to watch and will provide real-time feedback.
Live sound
Using a gate for sound applications can lower the overall system noise, improve intelligibility and increase gain before feedback caused by open mic channels. This can be for live music, in conference room settings or for a live panel discussion with multiple presenters wearing lavalier microphones. Set the threshold level so that the gate opens only when the vocalist or instrument is performing into the microphone.
Gating Drums
Using noise gates on drums is particularly useful in recording and in live sound. When a kit is set up with individual microphones on each drum in a live PA system, there’s potential for great sound. However, there are several gain management problems that can occur. Several microphones like the ones on the tom-toms, will be used only occasionally and until the time that the tom-tom is actually played, its microphone is picking up unwanted sound from other instruments on stage. This adds a lot of unwanted mush in the mix and also contributes to feedback problems. Use a gate on the signal of the tom-tom. adjust the threshold control so that the gate opens only when the tom-tom is played, and at the same time, so that the gate is closed even when the adjacent tom-tom is played. This same technique is useful on drums that have been recorded on individual tracks. By using a Gate to mute the bleed of the other drums, you can effectively reduce the comb filtering effect produced by phase cancellation due to microphone proximity.
Gating Longer Sounds
When using a noise-gate on sound with a longer decay like piano, it is usually necessary to use a longer release time. Adjust the threshold level on sustained passages to get the best results. Be sure to listen for the natural decay of the instrument and allow the gate to remain open until just after end of the decay.
Loudness Enhancement for broadcast
The compressed and uncompressed programs have the same peak levels, the compressed signal stays near peak level more of the time, and thus appears louder. This makes the broadcast more intelligible over the road noise in your car. For example, a 4:1 ratio with 10ms Attack and 0.1 sec release time and gain to cause 6-10dB of gain reduction. This will also help bring out a lead vocal or instrument in a cluttered mix. And will help with vocalists who do not have adequate dynamic control or mic technique. A little compression helps keep their softer lines from becoming buried in the mix.
Leveling a Vocal Track
When recording a vocal track, the vocalist may change the distance between their mouth and the microphone, or they may naturally have a lot of dynamic range in their performance. In either case, the sound engineer must decide how much compression should be used to balance the natural performance and printing a good level to tape or file. Set the compressor with a medium attack and release time and a ratio of 4:1. Adjust the threshold level so that the gain reduction meters show 6 – 10 dB of gain reduction. Adjust the ratio control if necessary.
Leveling a Guitar or Bass
Guitars and especially bass guitars can have a lot of level change between strings and even frets on the fingerboard. Using compression when recording a guitar and bass will help to even out these differences. Set up the compressor with a medium attack and release time and a ratio of 4:1. Then adjust the threshold level until you see about 10 – 12 dB of gain. With compressed guitar or bass you’ll notice that the each note is at the same loudness and the overall sustain is increased.
Compressing Drums
Adding compression on drums can tighten up a boomy kick drum, almost as if you were tightening the actual head of the drum. Set the compressor to a fairly quick attack time and use a ratio of 6:1. Set the threshold so that you see a gain reduction of about 12 – 15 dB. Adjust the ratio control as necessary. You can use the same basic set up on snare and toms as well.
Getting a Track to Sit in the Mix
By using a heavy amount of compression, you can get the effect of the vocal suspending in the mix. While this may be a bit radical for some, the effect can be dramatic especially if the vocal is mixed without any reverb or delay. Set up the compressor with a medium attack and release time and a ratio of 6:1. Now adjust the threshold until you see a gain reduction of about 21 – 24 dB.
Speaker Protection
A compressor/limiter should be last-in-chain before the power amps (or input to powered speakers) with its outputs feeding directly to the inputs of the amplifier. The fastest attack time possible will provide the maximum protection against overload, but will cause some alteration to the sound. Adjust the threshold and ratio so the system’s entire dynamic range is under control. Set the limiter control so it is 1 to 3dB below the clip level of your power amps. When using an active crossover, multiple compressors can be used to compress each section of the PA. By compressing each output of the crossover, you can maximize the output level while minimizing the gain to sensitive speakers like the one in mid-range.